This independent shoot is going to focus on the formal element form. Since I'm continuing portraiture/human form, form seems to be the most appropriate for this work. As a reminder, form is a three-dimensional shape, created with the use of light and tone.


Research
Annegien Schilling
Schilling is an indie photographer, well known for her movingly dramatic editing skills in her urban portraiture on her Instagram.


Annegien Schilling
Schilling is an indie photographer, well known for her movingly dramatic editing skills in her urban portraiture on her Instagram.


This self-portrait of Schilling is a very well known photo of hers since it symbolised body image and identity; something discussed often in media forms. The barcodes edited on her body say derogatory terms while she owns a slightly distressed expression; this conveys that the photo is clearly presenting identity/self-image issues. It's stereotypical for women to own these views on themselves either due to lack of confidence or they have been told so by others. Schilling is covered in black I believe ink smudges which create a distortion to any natural features on her. The light is directly facing her creating a lacking in shadows and depth; this is made up for with the ink on her skin though. The light shadows on her collarbone to define it present her form and dimension; this makes her appear more fragile in the photo. The background is plain and Schilling is in the centre of the frame while taking most of the space around, making her the only focal point.
Image Bank


These photos represent my ideas and enjoyed the style of more abstract portraiture. I considered incorporating physical objects into this next shoot, but before I do that I've decided to use more complex photoshop edits to make it appear more abstract in my portraiture. The last three photos from John Yuyi obviously is just physical portraiture with prints on the skin, but this can obviously be done with editing also. Schilling's work always owns complex edits and I find this admirable so I plan to attempt the same with my next shoot of portraiture.
These are my raw photos for my second independent shoot, captured on my DSLR camera.
Best Photos
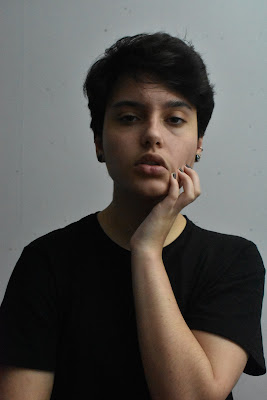
These are my best-captured photos, untouched.
These are my best-captured photos, untouched.
Photos that require improvement
I believe these photos do not fit up to par with the rest of my photos. Both appear awkward in composition, making them appear unflattering. For the first photo, the shutter speed was at 1/50, aperture F8, and exposure at ISO 12800; I feel as though the exposure was too high since the quality is slightly grainy, and since more of my skin is visible than in the other portraits, the photo just appears over-exposed. The position of my head creates an unflattering appearance since its tilted too far back, removing comfortable access to my face for the viewer, the facial expression also seems mid-motion and makes the photo seem more awkward in composition. If I were to retake this photo I'd lower the exposure to ISO 6400 so the photo is less grainy and doesn't appear over-exposed, and also re-position my head it's at a more flattering angle.
For the second photo, the shutter speed was at 1/50, aperture F8, and exposure at ISO 12800; this photo also appears grainy in quality, proving the ISO needed to be lower. Besides it appearing slightly over-exposed, my facial and body expression appears rigid and once again awkward; my shoulders are visibly stiff and my face suggests discomfort. If I were to retake this photo, I'd lower the exposure to ISO 6400 so the exposure is dimmer, improving the quality of the photo, and also just, in general, have a more comfortable exterior, since if I appear uncomfortable, that is likely to reflect on the viewer, which is not my intentions.
AO3: Record ideas, observations, and insights relevant to intentions reflecting critically on work and progress.
My Ideas
My intentions for my second independent shoot were unclear at first but decided I wanted to get more complex with my editing skills to see if this is something I could continue for the future. The edits are going to own a man vs nature aspect since I thought this would be interesting for model portraiture. When I first did a form shoot, they were also self-portraits, but there was nothing to them edit wise, nonetheless,, I enjoyed the form topic, and it inspired me to continue portraiture. I believe my photos have met my intentions for this shoot. The photos allow me to experiment with my editing skills and stick to my portraiture aesthetic, my only struggle was the attempt to brighten the exposure in the photos, causing them to appear slightly grainy.
My intentions for my second independent shoot were unclear at first but decided I wanted to get more complex with my editing skills to see if this is something I could continue for the future. The edits are going to own a man vs nature aspect since I thought this would be interesting for model portraiture. When I first did a form shoot, they were also self-portraits, but there was nothing to them edit wise, nonetheless,, I enjoyed the form topic, and it inspired me to continue portraiture. I believe my photos have met my intentions for this shoot. The photos allow me to experiment with my editing skills and stick to my portraiture aesthetic, my only struggle was the attempt to brighten the exposure in the photos, causing them to appear slightly grainy.
Reference to my best photos
The first photo of me in a dark setting looking away from the camera owns a slight dramatic effect which I personally enjoy. This photo was with the group that are slightly darker than the rest; making the shadowing more intense and creates a stronger depth. I think this helps with edit effect I'll add onto it later.
The fourth photo of me pulling slightly at my face while staring into the camera I believe is a good example of my love for alternative beauty. Pulling at my skin adds a distorted appearance to typical beauty modelling in portraiture. The positioning of my body is also centred evenly, creating a clean composition.
The last photo of me looking into the camera with my finger dragging my lip slightly down owns an editing intention. I plan to edit both sides of the face, with different pieces of nature to present different seasons. I enjoy the composition of my body posture and facial expression since they seem relaxed and welcoming to the viewer.
AO2: Explore and select appropriate resources, media, materials, techniques, and processes, reviewing and refining ideas as work develops.
Use of Camera
I used a Nikon D3400 DSLR camera and a tripod for every photo taken. Since these photos were taken of myself, I had to capture myself using self-timer while my camera was on a tripod, I used someone else to make sure all the camera settings, focus, and alignments were right. The camera was in manual mode, shutter speed being at 1/50 fraction of a second, aperture on F8, and exposure at ISO 6400 in the first 6 photos, and ISO 12800 in the rest since the lighting setup was very dark and I re-adjusted midway through. Once making sure everything was set right, I put the camera on self-timer (taking a photo every 5 seconds for 5 photos each time) and captured myself in various poses and areas.
Final Pieces
Firstly, I pressed CTRL+SHIFT+U to desaturate the whole photo, then using the 'Spot Healing Tool' to remove any blemishes and the specs on the background so nothing grabbed the attention besides the subject (myself). I used a layer mask of curves to burn the background/backdrop, so I'm in a better contrast and defined better.
Now I started the process to create the illusion of nature sprouting from my face. Firstly, I created a solid colour black layer over the photo. Then duplicating the original photo, and placing it over the black layer.
I selected the Pen tool and started to select the area of my face that I wanted to cut out. Once created I right clicked and pressed, 'Make Selection', then using the 'Marquee Tool' and right clicking to press 'Cut via Layer' to make sure the area has been selected and is its own independent layer, I'd then delete this layer since it isn't necessary for how I wanted my work to appear.
Simply cutting an area of my face out appears flat and removes depth, so I double clicked onto the duplicate layer, and pressed 'Bevel & Emboss', adjusting the depth, size and angle to fit appropriately to the direction the light and depth I want to the face.
Now I add in the actual piece of nature. Please note that I didn't have the time to actually capture my own pieces of nature, so the pieces used in this set are taken PNG files from the internet. Firstly, I simply dragged the piece onto my photo. I dragged this layer in between the duplicate and solid black layer after adjusting the layer so it is an appropriate place to create an illusion. I duplicate this layer, placing the duplicate over the original photo layer, then pressing control and clicking on the model layer while still on the plant layer, to then press layer mask, CTRL+I to invert this, so the plant layer appears still behind the face.
Now using the brush tool on a white soft brush setting, I'd paint areas where I wanted it to appear as if the plant was coming out of my face. After that, I added another layer above the original plant layer, to paint on some shadowing to add more dimension.
Firstly, I pressed CTRL+SHIFT+U to desaturate the whole photo, then using the 'Spot Healing Tool' to remove any blemishes and the specs on the background so nothing grabbed the attention besides the subject (myself). I used a layer mask of curves to burn the background/backdrop, so I'm in a better contrast and defined better.
Now I started the process to create the illusion of nature sprouting from my face. Firstly, I created a solid colour black layer over the photo. Then duplicating the original photo, and placing it over the black layer.
Simply cutting an area of my face out appears flat and removes depth, so I double clicked onto the duplicate layer, and pressed 'Bevel & Emboss', adjusting the depth, size and angle to fit appropriately to the direction the light and depth I want to the face.
Now I add in the actual piece of nature. Please note that I didn't have the time to actually capture my own pieces of nature, so the pieces used in this set are taken PNG files from the internet. Firstly, I simply dragged the piece onto my photo. I dragged this layer in between the duplicate and solid black layer after adjusting the layer so it is an appropriate place to create an illusion. I duplicate this layer, placing the duplicate over the original photo layer, then pressing control and clicking on the model layer while still on the plant layer, to then press layer mask, CTRL+I to invert this, so the plant layer appears still behind the face.
AO1: Develop ideas through sustained and focused investigations informed by contextual and other sources, demonstrating analytical and critical understanding.
Annegien Schilling was my main inspiration for this shoot, her strong edits I found impressive and admirable. Schilling's photos always own an urban style that is moving and calming at the same time, which is the intentions I want with my photos. With my next shoot, I'm going to actually incorporate physical objects in.
AO4: Present a personal and meaningful response that realises intentions and, where appropriate, makes connections between visual and other elements.
I believe my second independent shoot has been successful with my experimentation of editing. The edits were successful and add a more symbolic presentation to my portraiture. This is my second independent shoot.
Remastered
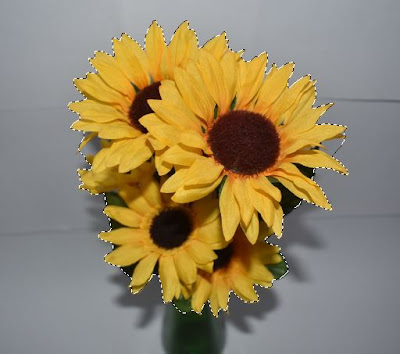
The original final pieces involved photos found online for the complete edits; this was to save time, but obviously, all resource needs to be mine in the end. I capture three different fake flower bouquets in different angles.
I selected the flower itself with the 'quick selection tool'.
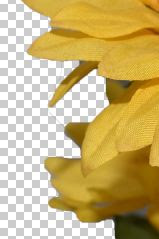
I right clicked and clicked 'layer via cut' which separated the flowers from the background.
Then double clicking the 'background' layer, to turn it into an editable layer. Then deleting this layer since it's not necessary.
The selection isn't always perfect so I use the 'quick selection tool' again or the 'lasso tool' to select areas that are still background pieces or not wanted in general.
Once selected I simply delete it by pressing the 'backspace' key.
I do this to any unwanted areas, then it's complete and ready to be used in my final edits.
....................
The editing process for these was the exact same as the first edits, I simply just used my own pieces of nature this time.


No comments:
Post a Comment